Hadoop to Snowflake: Steps to Migrate Schema & Data

With hundreds of petabytes of data generated every day from different sources, today’s modern world is a Big Data world. No doubt with the increasing data, distributed storage and compute environments are in great need. While Hadoop addresses most of these issues, it has its own limitations. Snowflake addresses almost all the limitations in Hadoop that makes Snowflake more subtle.
Let’s get into the detailed architecture on how to migrate from Hadoop to Snowflake.
Planning Hadoop to Snowflake Migration
While there are several ways to address Hadoop to Snowflake migration, we will cover a logical plan that can be followed to handle the migration seamlessly. There are two parts to this, Schema Migration and Data Migration.
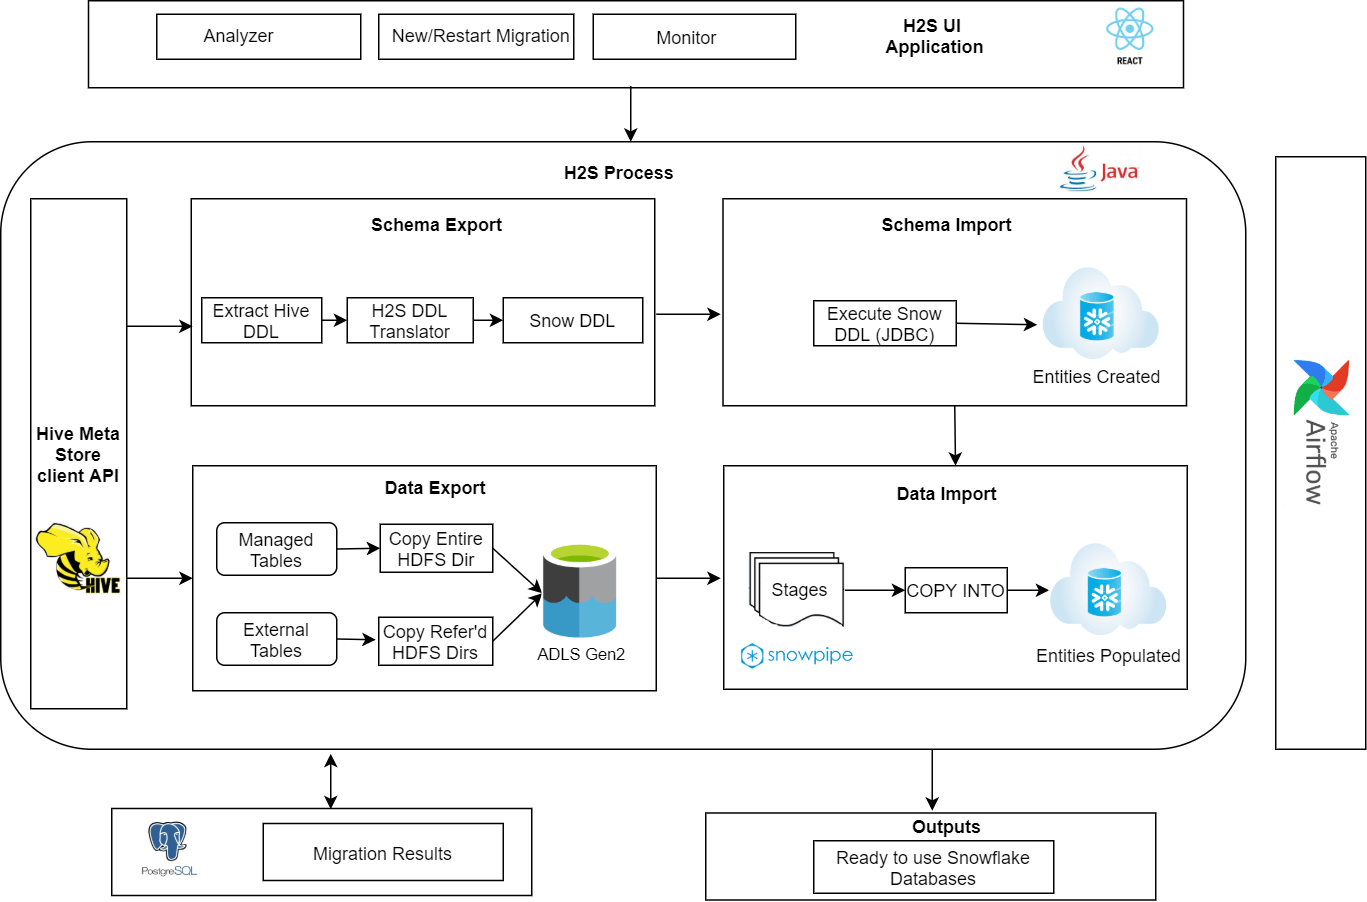
This high level architecture diagram summarizes our approach.

Schema Migration
The first step is migration of data model that involves databases, tables, views, stored procedures, etc.
Get Metadata
Metadata is all the information about tables and relations, such as schemas (column names & types), data locations, etc. All Hive implementations store this metadata in a relational database and provide client access to this information through metastore service API. We can invoke a call to NameNode using this metastore service API to get metadata. This metastore API gives a list of all databases, list of all objects in a database and list of columns, partition keys, table locations for a table, etc.
Create DDL Scripts
The metadata we got in the above step will be a list of objects. We need to create a schema translator that creates Snowflake DDL scripts using the Hive metadata. Few of the complications that schema translator needs to handle are:
- In Hive, the uses of database and schema mean the same thing and are interchangeable. So, we create a database in Snowflake and use the default schema provided by Snowflake in which we will create all the objects of that database.
- Table creation includes mentioning lists of columns and their data types. These data types differ from Hive to Snowflake, so, we need to maintain a mapping between hive and Snowflake data types.
- Hive has a way of dividing a table into related parts based on the values of partitioned columns. In Snowflake, this subset of columns is called a clustering key. A clustering key can be defined at table creation or afterwards
Execute DDL scripts in Snowflake
Once the DDL scripts are generated, we can connect to Snowflake and execute these scripts, which will create all our hive databases and its objects in Snowflake.
Data Migration
After migrating the data model, we will be migrating native data from Hadoop file system to Snowflake.
On-prem to cloud
The data can be moved from on-prem to any of the Snowflake supported cloud storage services. As of now Snowflake supports Amazon S3 buckets, Microsoft Azure containers and Google Cloud Storage buckets. There are many ways to migrate data from on-prem to cloud.
- Using command line tools to upload files.
E.g. AzCopy is a command-line tool that can be used to upload and download blobs/files from or to the Azure Blob Storage. Similar command line tools are available for S3 buckets and Google cloud storage buckets as well. - Using data migration services of the cloud providers.
E.g. Amazon S3 Transfer Acceleration, AWS Snowball, AWS Direct connect can be used to move data from on-prem to S3 buckets. - Using libraries that lets cloud storage be mounted as a part of the file system. This way we can read or write files to the cloud treating it just like a directory in a file system.
E.g. Blobfuse, S3FS, gcsfuse can be used for mounting to Azure containers, S3 buckets and Google Cloud Storage buckets, respectively.
Create External Stages
Snowflake can access data that is stored in other cloud storage environments. We can reference these external data files through external stages. We can create stages using Snowflake user interface or CLI client, SnowSQL.
Load Tables in Snowflake
The Snowflake tables can be populated from the external stages created in the previous step using SnowSQL commands. This can be done through bulk data load or snowpipe. Bulk data load requires a user specified warehouse to execute and loads data in a single transaction. Whereas snowpipe uses Snowflake supplied compute resources and does continuous data loading by splitting into multiple transactions based on size of the data which may lead to more latency. In most of the cases snowpipe will be more efficient and cost effective by following file sizing recommended by Snowflake.
H2S Accelerator
To handle this migration, Anblicks developed H2S, an Hadoop to Snowflake migration accelerator. With plenty of options available, we wanted to develop a low-cost solution that leverages open source technologies to perform big data migration
Please click here to know about Anblicks H2S self service accelerator to automatically migrate from Hadoop to Snowflake


